
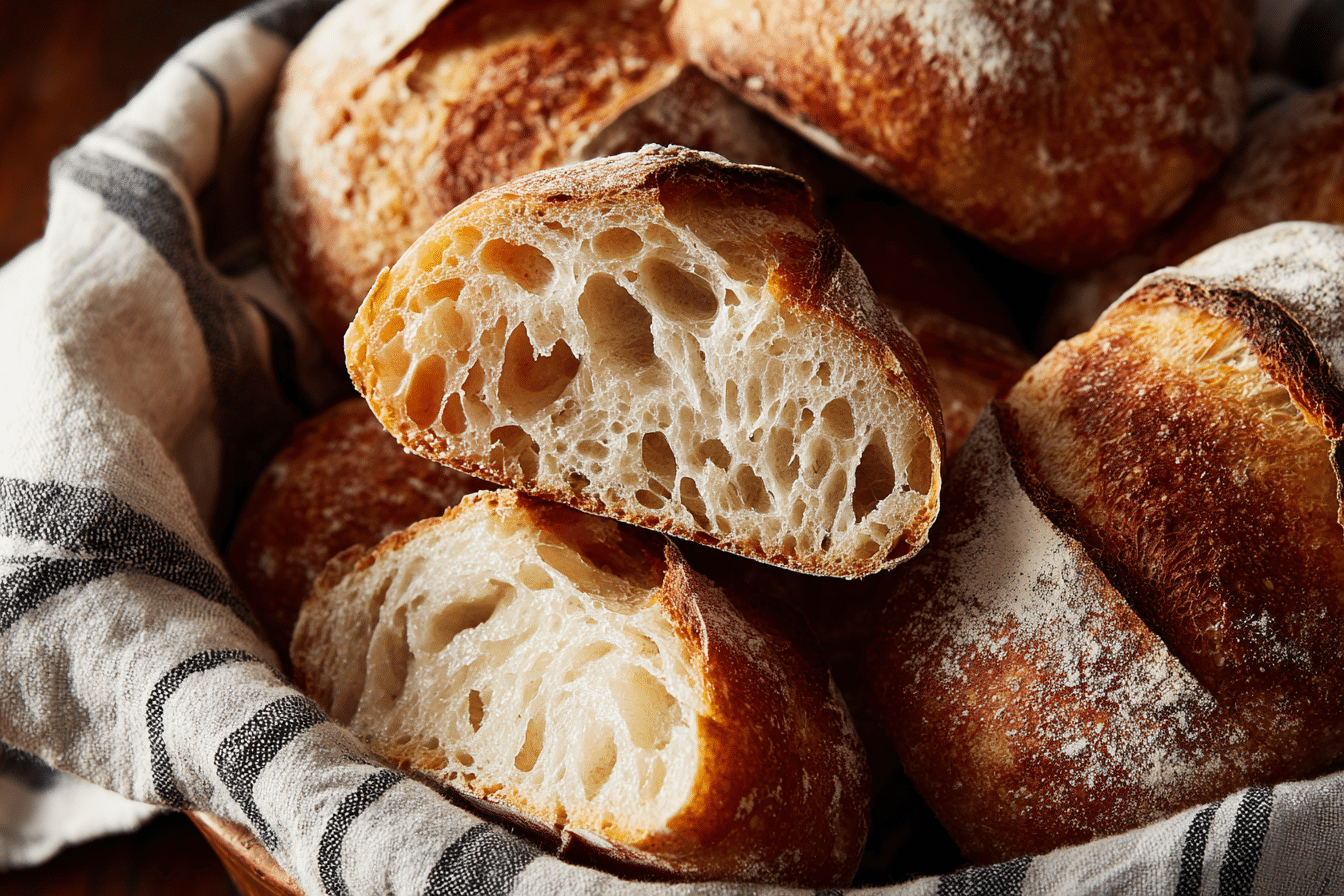
Few things compare to the satisfaction of baking your own rustic bread, especially when it’s this No-Knead Ciabatta with a light and airy crumb. Known for its open interior and crisp crust, ciabatta (which means “slipper” in Italian) is a bakery favorite — but it’s surprisingly achievable at home with no kneading and minimal hands-on time.
This version relies on a long, slow fermentation to develop flavor and structure, resulting in a crusty loaf with a chewy, delicate interior that’s ideal for dipping in olive oil, making panini, or simply slathering with butter. Whether you’re an experienced baker or trying artisan bread for the first time, this no-knead method makes it accessible and rewarding.
Ingredients Overview
Classic ciabatta uses just a handful of ingredients, but each plays a crucial role in achieving that airy texture and crisp crust.
Bread Flour
High-protein bread flour is essential for developing strong gluten, which supports the large holes in ciabatta’s signature crumb. All-purpose flour will work in a pinch, but the structure won’t be quite as open.
Tip: Look for unbleached bread flour with at least 12% protein.
Instant Yeast
Also known as rapid-rise yeast, this kickstarts the fermentation. You only need a small amount, since the long rise builds plenty of flavor.
Substitute: Active dry yeast also works — just proof it in a bit of warm water before adding to the mix.
Water
Hydration is key. This dough is very wet (around 80–85% hydration), which is what creates those airy holes inside. Use room temperature or lukewarm water.
Note: Don’t be tempted to add more flour — the sticky dough is part of the process.
Salt
Essential for flavor and also helps control the yeast activity during the long ferment.
Kosher or sea salt is preferred for better distribution in the dough.
Olive Oil (Optional)
Not traditional in all ciabatta recipes, but a small amount adds subtle richness and makes the crust a little more tender.
Step-by-Step Instructions
While there’s no kneading, this dough benefits from a few folds during the initial rise to build strength — no mixer required.
1. Mix the Dough (Night Before Baking)
In a large mixing bowl, stir together:
-
4 cups (500g) bread flour
-
1 1/2 tsp salt
-
1/4 tsp instant yeast
-
1 1/2 cups + 2 tbsp (400g) lukewarm water
-
(Optional) 1 tbsp olive oil
Mix with a wooden spoon or your hand until a shaggy, sticky dough forms. Cover with plastic wrap or a lid and let rest at room temperature for 12–18 hours.
Pro Tip: Use a container with straight sides to easily see when the dough has doubled.
2. Stretch and Fold
After the bulk fermentation, the dough should be bubbly and doubled. Wet your hands and gently perform a series of stretch and folds in the bowl:
-
Grab one side, stretch it up, and fold it over. Rotate the bowl and repeat 3 more times.
-
Do this 2–3 times spaced 30 minutes apart for best results.
Cover and rest between rounds. This strengthens the dough without kneading.
3. Shape the Dough
Generously flour your counter and gently tip the dough out without deflating it. It will be loose and sticky — that’s normal.
Sprinkle more flour on top and use floured hands or a bench scraper to divide it into two long, rustic loaves (or one large loaf). Transfer to a parchment-lined baking sheet or floured couche, seam side down.
Dust with flour and cover loosely with a towel. Let rest 45–60 minutes.
4. Preheat Oven and Prepare Steam
Place a baking stone or sheet pan in the oven and preheat to 475°F (245°C) at least 30 minutes before baking.
To create steam:
-
Place a metal pan on the lower rack while preheating.
-
When the bread goes in, carefully pour in 1 cup hot water and close the door immediately.
Steam helps develop that crisp, golden crust.
5. Bake
Transfer the parchment with the dough to the hot baking surface. Bake for 20–25 minutes, or until the crust is deep golden and the loaf sounds hollow when tapped.
For extra crunch, remove the parchment halfway through baking.
Cool completely on a wire rack before slicing.
Tips, Variations & Substitutions
-
Room Temperature Rise: Ideal range is 68–72°F. If your kitchen is cooler, allow more time (up to 20 hours). Warmer? Reduce the rise to 8–10 hours.
-
Skip Stretch and Fold (Lazy Version): You can skip the folding and still get a good result — just slightly less structured.
-
Flavored Ciabatta: Add chopped olives, roasted garlic, or sun-dried tomatoes during the last fold for extra flavor.
-
Whole Wheat Version: Substitute up to 25% of the flour with whole wheat. More than that will reduce the airiness.
-
Mini Ciabattas: Divide dough into smaller pieces to make sandwich-ready rolls.
Serving Ideas & Occasions
Ciabatta’s versatility makes it perfect for many occasions:
-
Sandwiches & Panini: The airy crumb soaks up sauces without getting soggy.
-
Soup Companion: Serve alongside tomato soup, lentil stew, or minestrone for dipping.
-
Breakfast: Toast slices and top with avocado, ricotta, or jam.
-
Entertaining: Serve as part of a bread basket with olive oil and balsamic vinegar.
It’s equally suited for casual lunches or dressed-up dinner parties. The rustic crust and tender crumb are always a showstopper.
Nutritional & Health Notes
Ciabatta is made with simple ingredients and no preservatives, making it a better alternative to many store-bought breads. It’s naturally:
-
Vegan
-
Dairy-free
-
No added sugar
If using olive oil, you’ll add a small amount of healthy fat. Opting for whole grain flour can improve the fiber content. For those monitoring carbs, ciabatta is higher in starch due to its white flour base, so portioning is key.
It also digests more slowly thanks to the long fermentation process, which may be easier on the stomach than some quick-rise breads.
FAQs
Q1: Why is my ciabatta dough so sticky?
That’s completely normal! Ciabatta dough is very high hydration — it should be sticky and wet. Use floured hands and tools to handle it gently.
Q2: Can I make this without a baking stone?
Yes. A preheated metal sheet pan works well too. Just make sure it’s fully heated to help with oven spring.
Q3: Can I refrigerate the dough?
Absolutely. After mixing, cover and refrigerate for up to 24 hours. Let it come to room temperature for 1 hour before shaping.
Q4: What’s the best flour for ciabatta?
Unbleached bread flour with high protein (12% or more) gives the best open crumb. All-purpose can work, but may yield a denser loaf.
Q5: Why didn’t I get big air pockets in the bread?
Possible causes include:
-
Not using high-protein flour
-
Overhandling or deflating the dough
-
Skipping stretch-and-fold steps
-
Not letting the dough rise fully
Q6: How do I store ciabatta?
Store loosely wrapped at room temperature for up to 2 days. For longer storage, freeze slices in a sealed bag and toast directly from frozen.
Q7: Can I double the recipe?
Yes. Just make sure to use a large enough bowl and adjust proofing space. Bake in batches or use two baking trays.
No-Knead Ciabatta with a Light and Airy Crumb
This no-knead ciabatta is light, airy, and crusty — perfect for sandwiches, soups, or toasting. No mixer or kneading required.
- Prep Time: 10 minutes (plus resting)
- Cook Time: 25 minutes
- Total Time: 13–20 hours (mostly inactive)
- Yield: 2 small loaves or 1 large 1x
Ingredients
-
4 cups (500g) bread flour
-
1 1/2 tsp salt
-
1/4 tsp instant yeast
-
1 1/2 cups + 2 tbsp (400g) lukewarm water
-
(Optional) 1 tbsp olive oil
Instructions
-
Mix flour, salt, and yeast in a large bowl. Add water and stir until a sticky dough forms.
-
Cover and rest at room temperature for 12–18 hours.
-
Perform 2–3 sets of stretch-and-folds, resting 30 minutes between.
-
Gently shape into 1–2 loaves on a floured surface. Rest 45–60 minutes.
-
Preheat oven to 475°F with a baking stone or tray inside. Place a metal pan below.
-
Transfer dough (on parchment) to the hot surface. Pour hot water into the lower pan for steam.
-
Bake 20–25 minutes until golden and hollow-sounding. Cool completely before slicing.
Notes
Use high-protein bread flour for best results. For added flavor, mix in olives or roasted garlic during the final fold. Store at room temp or freeze slices for later.